Thursday, June 28, 2012

oh, here's some more.

I meant to post more pictures of the apartment we recently finished, but got distracted by...
 
Replacing railings, lattice, stairs, and powerwashing this deck,

 Walking the dawg,

Oh, and painting the house.

So here are some "before" pictures of the rest of the living space. There are two bedrooms, the front one has huge french doors that can be opened so it can be used as a living room, and then there is a central living/dining room.
 The drop-ceiling was actually lower than the tops of the windows and all the windows were covered up with heavy blankets. The entrance to the only bathroom was through the back bedroom.

 The front room had peeling paint, patched-in drywall, broken windows, and the very top window is just a thin piece of plastic caulked into place.

 French doors are not original to the house, don't have matching hardware, don't fit the doorframe, and don't close. Also they have 4-5 broken panes.

 The front bedroom closet is unfinished bi-fold doors with graffiti all over (love notes, actually, to and from the previous tenants). The actual doorframe is much taller, but was lowered with a piece of drywall to make the bi-folds fit. The back of the closet is drywall, paneling, plywood, and holes. When we opened it up, we found dead birds inside the wall.

 Blurry picture, but notice the paneling, outdated ceiling fan, french doors that don't close, and urine-soaked carpet.

Broken windows, stuffed with old clothes.

Here's what we did.

 This is the front bedroom closet, where the old bi-folds were. We opened it up to the original frame (originally a doorway from the entryway into the living room when it was single family house), and special ordered 9-ft doors that matched the others we bought for the house. Obviously all new walls, shelving, and paint.

  It's not a very deep closet, but with the 10-ft ceilings and extra shelving, it seems like a TON of storage space.
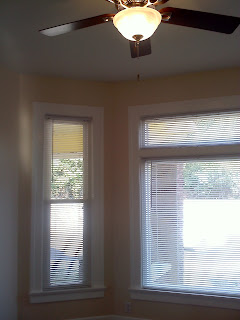
 Here are the front windows. All new energy-efficient vinyl. All the original trim was removed, stripped, sanded, and repainted. All the windowsills were re-built from scratch because they had been so badly chewed up by pitbulls. Both bedrooms and the living room have new updated ceiling fan lights.
 The two middle windows are "picture" windows, meaning they don't open, but are the same double-paned, argon-filled vinyl as the sash windows. I'd eventually like to find a piece of stained glass to hang on the top.

 My boyfriend and little brother spent hours sanding and stripping these old grates with a wire brush and repainting them. These intricate antique registers are so expensive to buy and so beautiful when they're cleaned up!


 You can start to see the refinished pine floors. After removing the carpet, and scraping all the peepee padding off the old floors, and tediously removing hundreds of staples, we rented a drum sander and spent two days sanding the floors down. They were stained, and water damaged, and uneven, and cupped, and just a mess. So we did heavy-duty sanding (which brought out the old smells!), stained it a darker color, and coated it with polyurethane. They're not perfect, but you can't see the holes or staining, nor can you smell the pitbull bladders. What you CAN see is the old beautiful wood grain, and smooth, clean, glowing floors.


 In this room, the original baseboards weren't present (as they had been replaced with that classy wood paneling), so I bought the tallest baseboard I could find at Lowes to come as close to matching as possible. It doesn't match the bedrooms, but it sure is pretty. I used this in both the living room and the kitchen.

 The paint color is Homestead Resort Cameo White by Valspar. We aim to put neutral but warm, inviting colors on the walls (I don't want to paint anything Rental-White). This color worked really well with the white trim, dark floors, and natural lighting that the house gets.

This is important! We installed a new wall air conditioning unit. This apartment would have been hard to rent in 90-degree weather without air conditioning and this unit does a really pretty good job of keeping the whole place cool. I installed its own electrical outlet directly under the unit so there would be no cord hanging down the wall, and finished it in white trim.

That's not all! Stay tuned!

Wednesday, June 13, 2012

Scrubadub

 Now the bathroom in this apartment was the MOST gutted. The bathroom, although original to the structure, seems to have been built as an afterthought on the back of the house. Instead of the basement continuing underneath it, it has a little crawlspace that is separate. In this crawlspace were leaking pipes (probably from freezing), trash, electrical wires from disused pipe-wrap, fiberglass insulation, and the inevitable effects of lots of moisture in a closed-up space. In the walls we found layers of old tile on old tile, covered in the-inevitable-effects-of-moisture-in-a-closed-space (we don't say the m-word). At least three of the wall studs were completely rotted away from a roof leak sometime in the past, since fixed. We removed all of the floor joists, effectively turning the bathroom into nothing more than a dirt pit on the back of the house.

Like I said in the last post, we had to drastically change the layout of the bathroom in order to both make it functional, and to give it an entry from a common area, rather than one of the two bedrooms.

In the old layout, there was an 18-inch vanity shoved in the corner, in front of the door, no door to speak of, a shower than ran lengthwise through the room, and a toilet in the very back corner that required one to squeeze past the tub in a walkway the width of a bus aisle to access. It also had a disgusting drop-down acoustic tile ceiling with a bath fan in it, that was venting moisture to between the drop ceiling and the old original crumbling plaster ceiling, again causing moisture problems.

The simplest and most elegant solution we could come up with to solve the problem of this very small, narrow bathroom was to special-order a tub to fit in the room widthwise. Standard tub size is 60". We bought a 54" tub. I guarantee most people wouldn't notice the difference, but it makes ALL the difference in the world for how to lay out this bathroom. We closed up the old doorway, re-ran all the supply lines and drains, properly venting all of them, raised the ceiling, installed proper ventilation, and of then of course, made it gorgeous.

The finishing touches include the ceramic tile tub surround. I used a white 6"x6" tile, slightly oversized, and laid it in a brick pattern, rather than grid pattern, reminiscent of the period of the house, while still fresh, clean, and durable. It was scaled to the height of the room (10-ft ceilings), rising to 8 feet above the floor. It was finished off with new Moen fixtures and a luxury curved shower curtain. This time I even added matching curtain rings and the shower liner.

The toilet is a brand new dual-flush from Costco. Looks sleek and modern, and saves water. A good deal from Costco, too!

The vanity is a cheap one from Home Depot, but nice enough looking and sturdy. Simple beveled glass mirror, matching vanity lights, separate lighted fan over the shower, and extra hardware and hooks for hanging clothes, towels, etc.

Here's the bathroom before we started:


Unfortunately, it's so cramped that it was hard to get good pictures because you can't get far enough away from anything.

TEAR IT OUT!! (you may want to hold your breath to look at these pictures)


 Gosh, who would cover up those gorgeous plastic barbie-pink tub tiles?! And with wet drywall?!

Without much work, I sold the tub and the toilet on craigslist. Also the kitchen appliances.

Here's the tub surround going in:


After grout, caulk, fixtures, and paint on the walls:


(I had to take that picture from outside the window to get the whole thing in! I'm in love!

The rest of the finished bathroom:

 Shower curtain liner and rings.

 Vanity from the doorway. (Sorry you have to see me too!)

 Dual-flush toilet. Also, notice the ceramic floors! Same as in the kitchen, also laid in a brick pattern.

 Doorway from the inside, extra robe hooks on the back of the door.

Enjoy! Wood floors come next!


Tuesday, June 12, 2012

You can't find a rental this good!

After finally removing my inherited nightmare tenants in October, we began the long process of completely overhauling this apartment in an old home built in 1920. The house was originally built as a single-family house, and made into a duplex sometime in the 70s or 80s, as far as I can tell. This is the bottom floor apartment. One thing that is great about the bottom floor apartment, versus the top floor, is that much of the old original trim and baseboards were still present. I try to never throw away historical architectural elements, and so instead, restored them and made this apartment into a completely updated, but still "historical" dwelling.

First things first, we hired a giant dumpster and tore everything out. The first layer on the walls was a sticky amber glaze from the constant cigarette smoke and kerosene heaters being used by the prior tenants. The next layer is badly textured drywall compound, then wood paneling, interesting old wallpaper, then crumbling plaster. The ceiling was a hanging drop-down style with fluorescent lights, also brown, and with water stains from upstairs leaking plumbing.  The floors: old carpet, not matched, patched together, covered in dirt, stains, and dog urine, then with carpet padding underneath. I wish I could describe to you the smell, because the picture is not complete without it. You could not breath in this place. During the first several weeks of working there, we got throat infections, coughs, and all kinds of respiratory trouble.

So we started over. We hired a giant dumpster, tore all the carpet, walls, windows, ceilings, doors, everything out. The wood floors were saved. The large beveled-glass french doors were saved. All of the original trim work and baseboards were removed, stripped, sanded, and repainted.

The 5-panel doors are the style of the period, but bought new, special order, from Lowe's.

We decided to do tile work on the bathroom and kitchen floors, the bath/shower surround, and the kitchen backsplash. I am thrilled with the results.

The old wood floors in the bedrooms and living room were sanded down and refinished in a dark stain that accentuates their character but looks sleek and clean.

All of the old vent registers were cleaned and painted.

I don't quite know where to start, so I'll start by going room by room and then maybe talking about some smaller specific projects.

Let's start with the kitchen.


We ended up changing the layout around a little bit. Where the old stove was, we opened up the wall for a doorway (which was already framed in behind some terrible paneling!) to the bathroom, so that it could be accessed through a common area, rather than only through the back bedroom. We moved the fridge to a more accessible spot, deepened that area, and turned it into a pantry. On the wall that was empty, we put the stove, and some countertop/bar seating.  Check it out:


I don't know if you can tell, but the cabinets are the same! I repaired them and built all new supports and frame on the bottom, cleaned them, sanded them, painted them, and put all new hardware. Then, with the brand new countertops and subway-tile backsplash, plus new sink and faucet, they almost look really good!

The back door was a find at the Habitat ReStore for $23 with amazing old intricate hardware. I refinished it and installed a full-light storm door for security and weatherproofing.

Here's the door we found in the wall, right where we wanted it! (to the bathroom)

More coming...